I have new paintings that I am so excited to share with you! The next auction at Soul Sisters United Art Collective on Facebook will take place Aug 2 & 3rd!
I love including images of my paintings-in-progress so this post may be a bit longer than other ones. Sharing my progress is important so you can see how it all comes together. And it shows all of my ugly stages too. I have a lot of them! Ha!
Damsel | 4×6 watercolour
I couldn’t not make another mini painting for this auction. I had no idea how fun they were until I made one for the previous month’s auction!
Don’t you just love damselflies?? We had recently visited a lavender farm and around the pond nearby were many blue damselflies. They were so beautiful glittering in the sun that I just had to include them in a painting!

Sadly, I didn’t take any other pictures I progressed through this piece. I usually like to show the pencil stage followed by watercolour colour paint and then the pencil and white highlights added in at the end.
Will you settle for a little detail? I hope so. 🙂

Oh gosh! Can I be in love with the way these little wings turned out? I just love all of the colour subtleties that make them look like stained glass with light filtering through.

Oh such yummy detail! Yum yum!
Damsel has been created on cold pressed 140 lb watercolour paper. The border pencilled in is sized to 4×6 and would look so wonderful inside a 5×7 sized window mat in an 8×10 frame. Don’t you think? 🙂

I am sure gonna miss her when she’s gone.
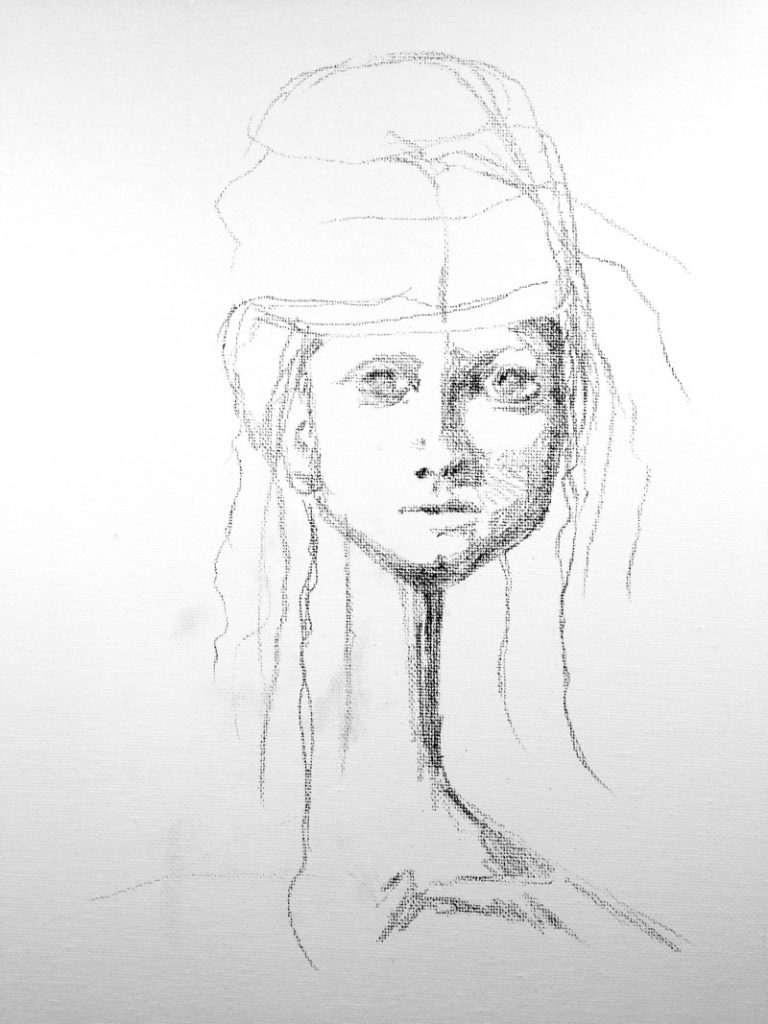
The Bee Keeper | 12×16 mixed media
Lately I have been wanting to paint more faces with charcoal, Stabilo All Pencil and gesso. Don’t get me wrong, I love watercolour so much, but I love this too!
My bee girl began with a simple and quick charcoal sketch.
I love to blend the charcoal with clear gesso. This technique not only cuts down on the powdery mess of charcoal but helps to seal it a bit. It is also much easier to blend, in my opinion, and get darker tones.

Ever do this??
I had originally thought of making the girl’s hair like a beehive but I just couldn’t see it in my mind’s eye so I left it for the time being. Her eyes looked a little small to me so I enlarged them to give her more presence and added more shadows to her face.
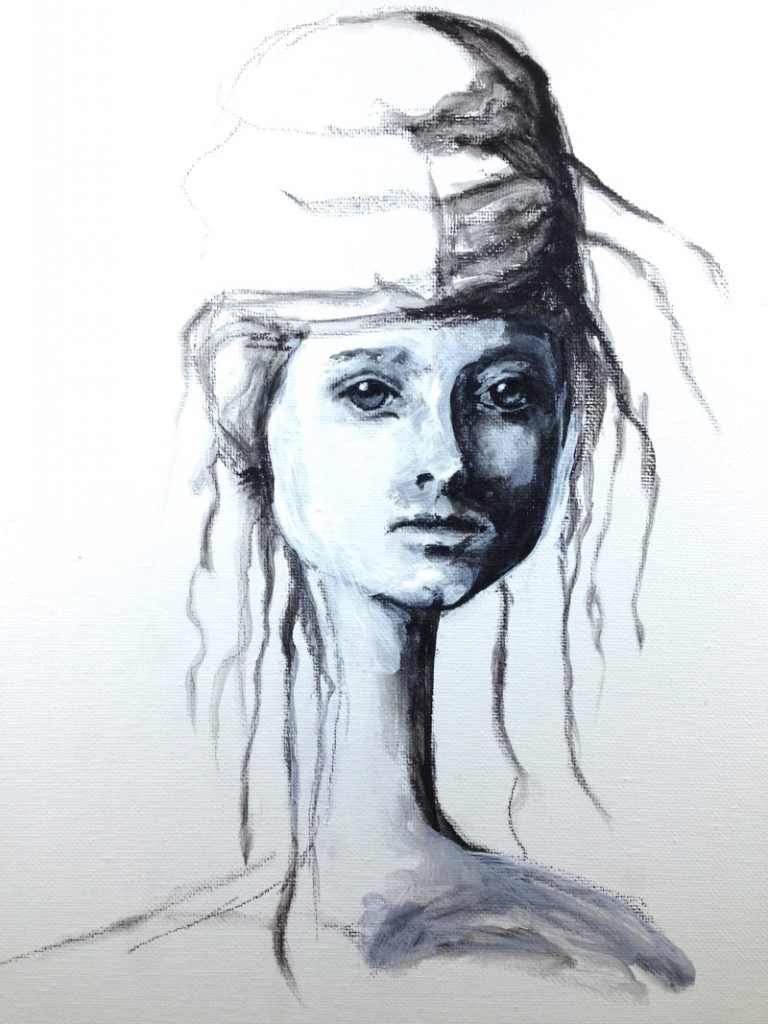
Adding Colour
Adding colour can be a challenge for me. Sometimes what I see in my head is challenging to convey on a canvas. I wanted to keep loose with this piece and I kept seeing an aqua green colour on her left side so just went ahead and added it, balancing it out by adding some of the green to her other side too and a bit to her eyes. See the little glint of gold in her eyes? I’ve been wanting to use gold in my work too which is so odd because I really don’t like gold. Or, I used to really not like it… 😉

After adding a bit more colour I sat back and looked at my progress. I was feeling frustrated because I just couldn’t see or feel where to go from here. Ugh! How frustrating it was when I really wanted to keep going but didn’t know where to go next! Should I continue and make a royal mess and perhaps destroy the entire piece in a moment of disgust or should I take a break, make a yummy tea and watch a half hour of Friends From College on Netflix. Yep. Tea and Netflix. Good plan! 😉

Too much colour?
Oh this is so funny for me to look at how I went from the previous picture to the one below! I had returned about an hour later (yes, two crazy funny episodes later!) and just began to add paint and spread it around with the edge of an old credit card. And I added some colour to her face. Truth be told, I wasn’t too sure if I should use the round and rosy cheek circle like I usually do. I didn’t know if it would fit well into this one…
I felt like I was starting to lose her in all that colour. Her lips didn’t stand out as much with the aqua green either.

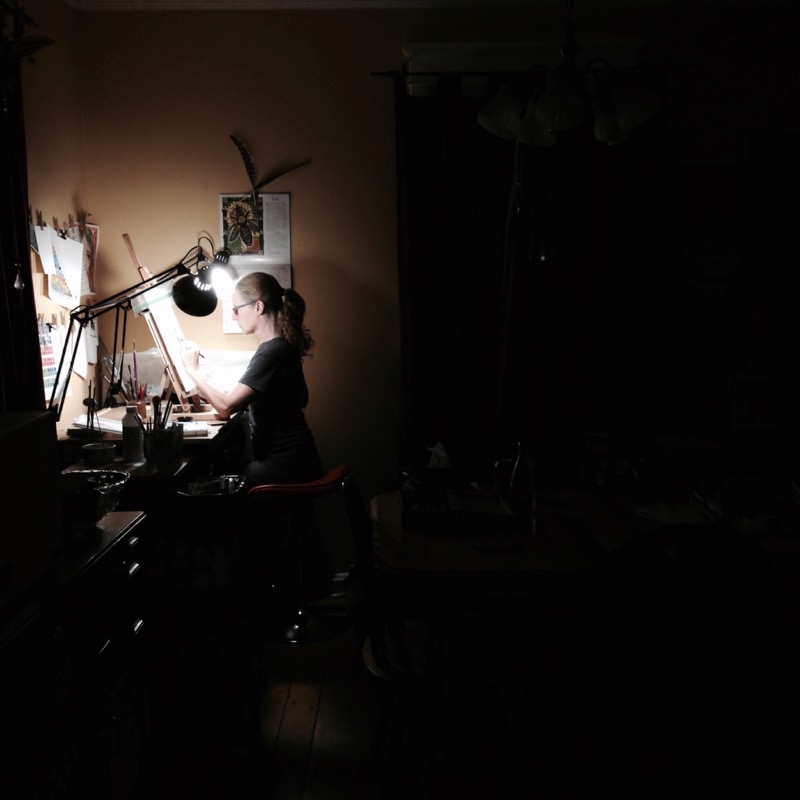
At some point in the evening my husband took this shot of me painting. It had gotten dark outside so I had shut the curtains on either side of me. It made for a very moody image and I love it! There I am squeezed into the corner of the dining room, finding a place and time to create. I just had to share it. 🙂
On a Roll!
Woot! The muses found me again and off I went painting away and feeling like I was really getting somewhere! I added more gold paint and figured out that I wanted her hair to have a big braid on the side and disheveled everywhere else. The bees love it!

Oftentimes I ask my husband what he thinks of my paintings as I am making them. Sometimes he hesitates because he doesn’t want me to be hurt by his criticism. I remind him that I can take it and it will only make me work harder and produce better work with constructive/subjective criticism. He was having a hard time connecting the bees to the girl and I told him she was a bee priestess and that was that. No wonder he hesitates sometimes with telling me what he thinks! His words did get me thinking though as they often do. During our conversation he had suggested adding some honeycomb. I decided to have a tea and then sleep on it.
Tamara, be open to Criticism
He was right. Honeycomb! Ha! But I didn’t want to add a honeycomb stencil although it crossed my mind. I painted the honeycomb/hexagon shapes freehand so they looked more organic and blended the shapes into her body. There. One with the bees she was! I also added some of the marvellous FW ink in gold to imitate honey dripping. If you haven’t used acrylic inks before you should try them. They are so fun and they are lightfast too! 😉

Finished!!…?
I was finished! Until I wasn’t.
I am learning to stop before I do too much but at the same time I am also learning that I have to be open to ‘fixing’ a painting. My Bee Keeper was now grounded with the hive and bee on her shoulder but her other side looked weird to me. I added a little ‘armpit’ mark and some honey drips with the FW acrylic inks.
I then painted the canvas edges with a mishmash of the same colours used throughout, signed the piece and gave her a light spray so the water-soluble areas didn’t smudge in case I missed some with the gesso.
Finished!!
I am so happy with my Bee Keeper! She really came together for me after much time and love and I am so happy to her available for our next Soul Sisters Auction!

I am going to miss her too…
But that’s good, right?
Truthfully?? I know many will say that you should create paintings for yourself but there is nothing like the feeling you get when someone tells you how much they like/love your work. When I wrap up a piece that has so much of myself wrapped up in it, I feel so fortunate, so grateful to do what I do.
I hope to see you at the next auction coming up soon!!
Thank you so much. My heart swells.
And remember, happy creating, in whatever way is your own way.
Moongirl xx
** I am in the process of creating a newsletter! Yay! You can sign up for it here!**
Bee Keeper is STUNNING! From beginning to end! ♥♥♥♥♥♥♥♥♥
Thank you so much, Robin!! xx
Pingback: New art supplies I’m excited to share them with you! | Moongirl Art